The Grounds Guys offer some expert guidance on edging your landscaping with stone for a polished, durable finish.
|
Have you walked past a home in the neighbourhood that has been landscaped using stone and admired the bold, clean look it offers? From afar, it may look like a relatively simple job, but for people who are unfamiliar with landscaping techniques, it can be an involved and complicated do-it-yourself project. That is because when it comes to hardscaping your property, there are a variety of options to choose from. Depending on the option you choose, a hardscape can really make your property stand out and set it apart from the other homes in your neighbourhood.
If you’ve been considering edging your landscaping using stone, but you don't know where to start, we’ll share some advice that can help you get it done. We’ll walk you through how a professional landscaper would handle this project and how to avoid some common DIY mistakes.
Safety First
Before you even begin to move the first mound of dirt, there are a few steps you need to take to ensure you and everyone involved in this project is safe. The first step is to call or contact your local utility company to check for any underground utilities that are in the vicinity of where you plan to dig. This will help you avoid hitting a buried line while digging, which can disrupt utility service, cost money to repair, or cause serious injury. Check out Click Before You Dig for more details regarding safety protocols you can take. If you have an irrigation or sprinkler system, you might want to take note of how close the sprinkler heads are to where you plan to dig. Again, you don’t want to cause extra work by inadvertently breaking a water line while digging. If this first step makes you uncomfortable, it’s best to reach out to the professionals, like The Grounds Guys to handle it for you. We have the experience and expertise to avoid such an issue.
Choosing the Stone
One of the nice things about using stone or other hardscape material to edge your landscaping is the variety of options you have to choose from. Everything from river rock, natural sandstone, and polished mixed stone to decorative gravel and pavers are available depending on the look you’re trying to achieve. In fact, there are so many choices, it can be a little overwhelming. This is another area where the expertise and advice of a professional can be so valuable. If you’re unsure of what option will look best for your property, call The Grounds Guys. We can provide you with great design ideas, suggest the right type of hardscape material, and even do the project for you.
Measure and Outline
Once you’ve decided on the type of material you will use, it’s time to design and layout your hardscape. Where are you planning to edge with stone? Are you looking to edge a garden, a walkway, the driveway? Or are you planning to edge with stone and incorporate other hardscape options into your landscaping, too? Once you’ve figured out what and where you want to add the stone edging, you’ll need to measure and outline the area so you are aware of how much material is needed and where you need to dig. Accuracy during this stage can save you a lot of time and energy later on (not to mention a lot of extra trips to the supply store), so take your time. It will also ensure a more polished look. So it’s best to measure twice to avoid additional work later on.
Related Article: How to Landscape with Rock
Digging the Trench
Once you have marked the area where you are going to lay your stone, you can begin digging. Depending on your type of soil, use a shovel, pickax, or a hoe to create a trench along the designated area. If you have soil that contains rock and medium-size boulders, a pickax will be your best option for digging.
The trench where you lay the stone should be roughly 5 to 8 cm deep, depending on the size of your edging material. Keep the loose dirt nearby to use as filler around your stones once they are in place.
Adding Leveling Sand
If you’ve decided to use flat stones or pavers, you will need to make sure the ground you place then on is level. So once you have your trench dug, smooth out any loose dirt and try to get the ground as level as possible. Adding leveling sand to your trench will help even out any areas that need to be raised. Leveling sand, which is made from finely crushed stone, provides a great foundation for laying your stone. Using leveling sand can ensure your stones are level and stay in place for years to come. Once you add leveling sand, compact it with a tamper (a tool with a long handle and a heavy, square base). This will compress the sand and dirt and provide a solid base on which to lay your stone.
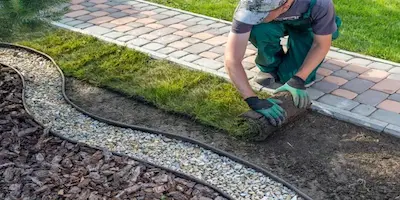
Arranging the Stones
Start at one end of your trench and begin laying the edging stones end to end in the desired design. Layer any larger stones on the bottom to provide a wider base, then top them with the smaller stones to form solid layers. If you are using stones that are all the same size, this will not apply. Instead, simply lay the stones as desired. One option is to overlap the stones in an alternating pattern (two stones at the base, with one stone centered over the two on the bottom). Continue the pattern until you have completed your row(s).
Level Stones
If you are placing your stones in a straight line, you can use a carpenter’s level to keep the stones aligned. You can also use the level to confirm that the stones are resting level on the surface and with each other. Carpenter levels come in several different lengths. So depending on the length of your edging stones, choose a level that will span across a few stones. A 2”x4” or other pieces of straight lumber can also be used to set the stones in a straight line.
On curved sections, you can use a torpedo level instead. A torpedo level is a type of spirit level that is essential for tight spaces. This level is made of either metal or plastic and contains two or three tubes of liquid. The tubes contain a yellowish-green fluid that is used to indicate if the surface is level. Add leveling sand as needed and use a rubber mallet to level the stones as you go.
Fill in any Gaps
One of the final steps in this process is to fill in any open spaces between the stones. Use the leftover dirt from your trench (remember, you were supposed to save it) to secure the edging along your row(s) of stones. This is where neatness counts, so try to make it look as neat as possible. It’s best to wear a pair of gardening or work gloves when handling and maneuvering the stones and dirt to save your hands from getting completely dirty!
Professional Hardscape Services
When done right, edging your landscaping with stone creates a very elegant, professional look for your property. It can really help set your home apart from other homes in your neighbourhood. But it’s not an easy job to start and complete. So if you need help, or you have plans to do a more complex project, or you would like to hear about different hardscape options, call The Grounds Guys today! Our team of professional landscape experts can help bring your landscape vision to life!